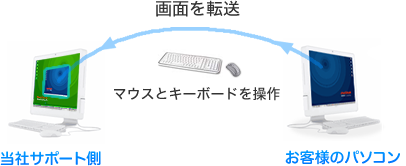
開発仕様の公開
放射線測定器 API・SDK
簡単なプログラミングで放射線測定器をコントロールできます。
対応プログラム言語: C, C++, Java, .NET C#, Basic, Arduinoスケッチ, Lazurite, Raspberry Pi-Java


放射線測定器の通信仕様を公開(API/SDK)
ポリマスターの放射線測定器の通信仕様を公開しています。Windows のプログラムから、あるいはRS485といったハードウェアでのシリアル通信まで幅広い開発にポリマスターの測定器を利用することができます。
ポリマスターの放射線測定器には、すべて校正証明書がついており、公的な機関のための開発にも利用できます。。また高い防水性能、耐衝撃構造など、野外での利用にも活用することができます。
対応機種
USBやBluetooth 接続を行いながら、リアルタイムにデータを取得できる機種などは、車やドローンなどの移動体で測定しながらデータ収集を行うことができます。また本体のメモリに測定値を蓄積するタイプは、長期間の被ばく調査などに利用することができます。
RS485 に対応した機種では、有線ケーブルを理論的には、1500m まで延長できます。USBは、5m まで、Bluetooth は理論的には、10m 程度になります。
その他、たろうまるでは、920MHz 帯域を使い 600m~1500m 程度の無線接続も実現しております。
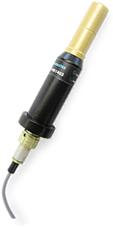
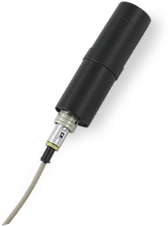
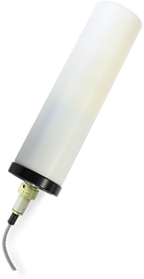
| 機能 | BDG1 | BDG2 | BDG3 | BDN |
|---|---|---|---|---|
| 写真 | 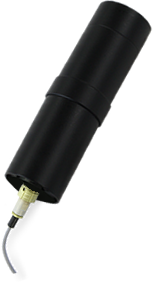 |
 |
 |
 |
| 測定器の仕様 | ||||
| 検出器 | NaI シンチレーション | ガイガーカウンター | CsI シンチレーション | He3 検出器 |
| 線種 | ガンマ線 | ガンマ線 | ガンマ線 | 中性子線 |
| 測定範囲 | 0.01 μSv/h ~ 100 μSv/h | 0.01 μSv/h ~ 10 Sv/h | 0.01 μSv/h ~ 40 μSv/h | 1.0 μSv/h ~ 5,000 μSv/h |
| 使用温度範囲 | -20~+50 ℃ | -40~+50 ℃ | -20~+50 ℃ | -20~+50 ℃ |
| 大きさ | 290mm x 直径 70mm | 162mm x 直径 40mm | 133mm x 直径 40mm | 233mm x 直径 63mm |
| 重さ | 1200 g | 110 g | 160 g | 700 g |
| 接続方式 | ||||
| USB |  |
|
|
|
| RS-485 | |
|
|
|
| RS-232 (変換必要) | |
|
|
|
| 電源 | ||||
| 電圧 | 4.6~5.5 V | 3.3~13.0 V | 4.6~5.5 V | 3.3~13.0 V |
| 消費電流(線量率に比例) | 150~160 mA | 0.56~2.8 mA | 6.9~9.0mA | 9.4~10.5mA~ |
| APIの機能 | ||||
| 線量率(Sv/h) | |
|
|
|
| 積算線量(Sv) |  |
|
|
|
| 積算線量のリセット | |
|
|
|
| 測定のリセット | |
|
|
|
| cps | |
|
|
|
| 測定誤差(%) | |
|
|
|
| スペクトル測定 | |
|
|
|
| 小電力モード | |
|
|
|
| アラーム音 ON/OFF | |
|
|
|
| シリアル番号の取得 | |
|
|
|
| アラーム発動設定値の変更 | |
|
|
|
| 対応開発言語 | ||||
| C言語 | |
|
|
|
| .NET Visual C# | |
|
|
|
| .NET Visual Basic | |
|
|
|
| Java | |
|
|
|
| Android Java | |
|
|
|
| Arduino スケッチ | |
|
|
|
| Lazurite C言語 | |
|
|
|
| Raspberry Java | |
|
|
|
開発API、サンプルコードの無償公開
開発に対応したモジュールを購入された利用者には、開発API やサンプルコードを無償で提供しております。
サンプルコードを基本にすることで、放射線測定モジュールを既存のシステムに簡単に組み込むことができます。
このページで紹介した検出器以外でも、Polimaster のすべての測定器は、同様な API を提供することができます。
お申し込み・お見積もりはこちらへ開発事例
ドローンによる放射線測定の地図化・マッピングシステム
原子力発電所の周辺調査に使うための Android アプリです。測定器 BDG2 、BDG3 を使い測定値を自動的に地図上に線量の強さに応じて色分けしてマッピングします。
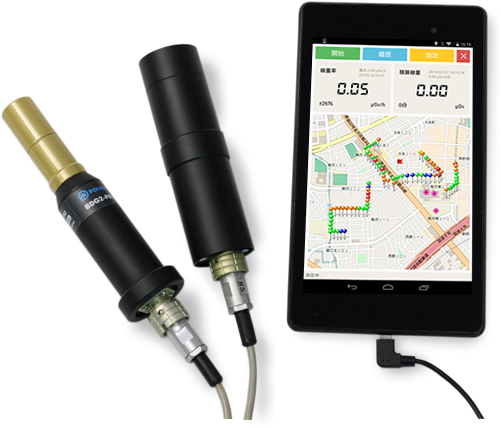

地図データの合成
測定範囲が広い場合には、ドローンを使って複数回に分けて測定したデータを一つの地図にすることができます。
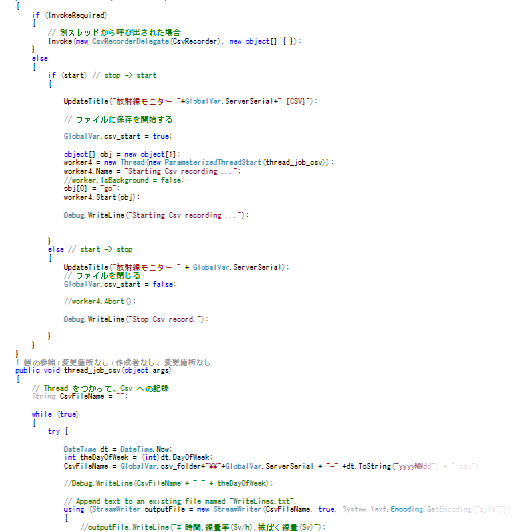
サンプルコード
こちらのサンプルコードは、Linux 版 C言語, Windows 版 .NET C#, .NET VB 、Android 版 Java、Arduino, Lazruiteなどです。
パソコンから放射線測定器のデバイスに USB接続、またはシリアル通信で接続し、線量率(μSv/h)の値を取得するコードとなっています。
命令取得コマンドの部分だけ非公開になっています。秘密保持契約後に、命令コマンドの部を埋めることで動作するようになっています。
/***************************************************************
 * Linux - C言語 サンプルプログラム (命令コマンド部分は購入後に公開しております)
 ***************************************************************/
main(){

  BYTE buffer[BUFFER_SIZE];
  buf[BUF_SIZE];
  ssize_t ret, len, wrlen;

  /* 初期化 */
  init();

  /* シリアルポートを読み書き可能な非制御端末 ttyS3 をオープン */
  serial_fd = open(”/dev/ttyS3”, O_RDWR | O_NOCTTY );

  /* エラーメッセージの表示 */
  if (serial_fd < 0){ exitfail_errno(”open”); }

  /* 終了シグナルに対してハンドラを設定 */
  set_sig_handler( terminate_sig_list,  ARRAY_SIZE(terminate_sig_list),  terminate_sig_handler);

  /* シリアルポートを設定 */
  setup_serial(serial_fd);

  /* バッファーを0で初期化 */
  clearbytes( buffer, BUFFER_SIZE);

  /* 命令文を格納 */
  buffer[0] = COMMAND_1;
  buffer[1] = COMMAND_2;
  buffer[2] = COMMAND_3;

  /* 命令分を送信 */
  ret = write(serial_fd, buffer, sent );
  if (ret < 0) { exitfail_errno(”write”); }

  /* バッファーを0で初期化 */
  clearbytes( buffer,BUFFER_SIZE);

  /* シリアルポートから読み込み 、5回チャレンジ */
  for(x=0;x<5;x++){
    ret = read(serial_fd, buffer, BUFFER_SIZE);

    if (ret < 0){  /* 受信失敗 */
      if( errno == EINTR){ exitfail_errno(”read”);}
    }else{ /* 受信成功 */
      printbytes(”Received : “, buffer, ret);
      /* 線量率、積算線量、積算時間の表示 */
      if( checker( buffer, sent, ret ) == 1){
      	print_R_data( buffer,sent ); break;
      }else{
      	exitfail_errno(”not match”);}
    }
   }
  return EXIT_SUCCESS;

}
'========================================================= '
'                                                          '
'  .NET Visual Bacis 言語サンプルコード (命令コマンド部分は購入後に公開しております)    '
'                                                          '
'========================================================= '

Imports System.Collections.Generic
Imports System.Linq
Imports System.Text
Imports System.IO.Ports
Imports System.ComponentModel
Imports System.Data
Imports System.Diagnostics
Imports System.Threading
Imports System.Management
Imports USBXpressNET

Namespace BDG_VCS
    Module mainModule
        Sub Main()

            Dim myDevice As New Serial()

            ' デバイスと接続して、命令を送信、受信データを待ちます '
            myDevice.start_serial()
            myDevice.make_command()
            myDevice.send()
            myDevice.ReceivedAction()

        End Sub
    End Module

    Class Serial

        Public PACKET_HEAD As Byte = &H55
        Public DEVICE_ID As Byte = &H30
        Public crc As Crc

        Private Const BUFFER_SIZE As Integer = 128
        Private Const WAITTIME As Integer = 5000
        Public writeBuffer As Byte() = New Byte(BUFFER_SIZE - 1) {}
        Public readBuffer As Byte() = New Byte(BUFFER_SIZE - 1) {}
        Public Handle As UInteger
        Public count As Integer

        Public MainEncording As Encoding = Encoding.ASCII

        Public Sub start_serial()

            crc = New Crc()

            Dim devices As Integer = 0
            Dim x As Integer = 0
            Dim productstrings As String = ""

            ' デバイス情報を取得します '
            Dim retVal As ReturnValue = API.GetNumDevices(devices)
            Dim retVal2 As ReturnValue = API.GetProductString(x, productstrings, DirectCast(0, GetProductOptions))
            Debug.WriteLine("SI_RETURN_SERIAL_NUMBER : " & productstrings)
            Dim retVal3 As ReturnValue = API.GetProductString(x, productstrings, DirectCast(1, GetProductOptions))
            Debug.WriteLine("SI_RETURN_DESCRIPTION : " & productstrings)
            Dim retVal4 As ReturnValue = API.GetProductString(x, productstrings, DirectCast(2, GetProductOptions))
            Debug.WriteLine("SI_RETURN_LINK_NAME : " & productstrings)
            Dim retVal5 As ReturnValue = API.GetProductString(x, productstrings, DirectCast(3, GetProductOptions))
            Debug.WriteLine("SI_RETURN_VID : " & productstrings)
            Dim retVal6 As ReturnValue = API.GetProductString(x, productstrings, DirectCast(4, GetProductOptions))
            Debug.WriteLine("SI_RETURN_PID : " & productstrings)

            If devices > 0 Then

                Debug.WriteLine("{0} 個のデバイスが見つかりました !", devices)

                retVal = API.Open(0, Handle)
                If retVal = ReturnValue.SI_SUCCESS Then

                    ' 無限に待つ場合 Dim inifity As Integer = 0xFFFF; '
                    Dim notinfinity As Integer = 5000
                    '最初、送受信バッファーを空にします '
                    API.FlushBuffers(Handle, True, True)
                    ' 送受信の待ち時間を設定 '
                    API.SetTimeouts(notinfinity, notinfinity)
                    ' ボードレートの設定 '
                    API.SetBaudRate(Handle, 115200)

                Else
                    Debug.WriteLine("デバイスが見つかりません")
                    Environment.[Exit](0)
                End If
            End If
        End Sub
        Public Sub make_command()

            ' 送信コマンドの作成 '
            writeBuffer(0) = PACKET_HEAD
            writeBuffer(1) = COMMAND_1
            writeBuffer(2) = COMMAND_2
            writeBuffer(3) = COMMAND_3
            writeBuffer(4) = crc.makecrc(writeBuffer)
            write_command(writeBuffer)

        End Sub
        Public Sub send()
            Debug.WriteLine("Write: " & Convert.ToString(writeBuffer))
            write_command(writeBuffer)
        End Sub
        Public Sub ReceivedAction()
            ' 受信データの処理 '
            Debug.WriteLine("Read: start index count = " & count)
            Dim ret As ReturnValue = API.Read(Handle, readBuffer, count)
            If ret <> ReturnValue.SI_SUCCESS Then
                Debug.WriteLine("Read is not success !!! {0}", ret)
            Else
                If crc.checkcrc(readBuffer) Then
                    '正しく受信できているので、'
                    Debug.WriteLine("Read:" & BitConverter.ToString(readBuffer, 0, readBuffer.Length))
                    Dim data_printer As New BDG2_data()
                    ' 誤り訂正符号のチェック '
                    If readBuffer(2) = COMMAND_X Then
                        data_printer.command_R(readBuffer)
                    End If
                End If
            End If
            '待ち時間'
            Thread.Sleep(WAITTIME)
        End Sub
        Public Sub write_command(ByVal buffer As Byte())
            'デバイスへの書き込み'
            Debug.WriteLine("Write in byte : " & BitConverter.ToString(buffer, 0, buffer.Length))
            Dim ret As ReturnValue = API.Write(Handle, buffer, count)
            If ret <> ReturnValue.SI_SUCCESS Then
                Debug.WriteLine("Write not success !!! {0}", ret)
            End If
            '待ち時間'
            Thread.Sleep(WAITTIME)
        End Sub
        Public Sub close_serial()
            API.Close(Handle)
        End Sub
    End Class

    Class BDG2_data

        Public Sub command_R(ByVal buffer As Byte())
            ' 受信データを出力ロジックをここに書きます '
            ' ..... '
            ' ..... '
            ' ..... '
            ' ..... '
        End Sub
    End Class

End Namespace
/***************************************************************
 * .NET C# 言語サンプルコード(命令コマンド部分は購入後に公開しております)
 ***************************************************************/
using System;
using System.Collections.Generic;
using System.Linq;
using System.Text;
using System.IO.Ports;
using System.ComponentModel;
using System.Data;
using System.Diagnostics;
using System.Threading;
using System.Management;
using USBXpressNET;   // USBXpressNET ライブラリが使えるようになります。

namespace BDG_VCS
{
    class Program
    {
        static void Main(string[] args)
        {
			// デバイスと接続して、命令を送信、データを受信します。
            Serial myDevice = new Serial();
            myDevice.start_serial();
            myDevice.make_command();
            myDevice.send();
            myDevice.ReceivedAction();
        }
    }
    class Serial
    {
        public byte PACKET_HEAD = 0x55;
        public byte DEVICE_ID = 0x30;
        public Crc crc;

        private const int BUFFER_SIZE = 128;
        private const int WAITTIME = 5000;
        public byte[] writeBuffer = new byte[BUFFER_SIZE];
        public byte[] readBuffer = new byte[BUFFER_SIZE];
        public uint Handle;
        public int count;

        public Encoding MainEncording = Encoding.ASCII;

        public void start_serial()
        {
            crc = new Crc();

            int devices = 0;
            int x = 0;
            string productstrings = "";

			// デバイス情報の取得
            ReturnValue retVal = API.GetNumDevices(out devices);
            ReturnValue retVal2 = API.GetProductString(x, out productstrings, (GetProductOptions)0);
            Debug.WriteLine("SI_RETURN_SERIAL_NUMBER : " + productstrings);
            ReturnValue retVal3 = API.GetProductString(x, out productstrings, (GetProductOptions)1);
            Debug.WriteLine("SI_RETURN_DESCRIPTION : " + productstrings);
            ReturnValue retVal4 = API.GetProductString(x, out productstrings, (GetProductOptions)2);
            Debug.WriteLine("SI_RETURN_LINK_NAME : " + productstrings);
            ReturnValue retVal5 = API.GetProductString(x, out productstrings, (GetProductOptions)3);
            Debug.WriteLine("SI_RETURN_VID : " + productstrings);
            ReturnValue retVal6 = API.GetProductString(x, out productstrings, (GetProductOptions)4);
            Debug.WriteLine("SI_RETURN_PID : " + productstrings);

            if (devices > 0)
            {
                Debug.WriteLine("{0} 個のデバイスが見つかりました !", devices);
                retVal = API.Open(0, out Handle);
                if (retVal == ReturnValue.SI_SUCCESS)
                {
                    int notinfinity = 5000; //int inifity = 0xFFFF;
                    API.FlushBuffers(Handle, true, true); // 送受信バッファーを空にする。
                    API.SetTimeouts(notinfinity, notinfinity); // 送受信の待ち時間の設定
                    API.SetBaudRate(Handle, 115200); // ボードレートの設定
                }
                else
                {
                	// デバイスが見つからない場合
                    Debug.WriteLine("No devices found");
                    Environment.Exit(0);
                }
            }
        }
        public void make_command()
        {
			// 送信コマンドを作成
            writeBuffer[0] = PACKET_HEAD;
            writeBuffer[1] = COMMAND_1;
            writeBuffer[2] = COMMAND_2;
            writeBuffer[3] = COMMAND_3;
            writeBuffer[4] = crc.makecrc(writeBuffer);
            write_command(writeBuffer);
        }
        public void send()
        {
            Debug.WriteLine("Write: " + writeBuffer);
            write_command(writeBuffer);
        }
        public void ReceivedAction()
        {
			// データを受信した場合
            Debug.WriteLine("Read: start index count = " + count);
            ReturnValue ret = API.Read(Handle, ref readBuffer, out count);
            if (ret != ReturnValue.SI_SUCCESS)
            {
            	// 受信失敗の場合
                Debug.WriteLine("Read is not success !!! {0}", ret);
            }
            else
            {
                if ( crc.checkcrc(readBuffer) ) // 誤り訂正符号のチェック
                {
                    Debug.WriteLine("Read:" + BitConverter.ToString(readBuffer, 0, readBuffer.Length));
                    BDG2_data data_printer = new BDG2_data();

                    if (readBuffer[2] == COMMAND_X)
                    {
                        data_printer.command_R(readBuffer);
                    }
                }
            }
            Thread.Sleep(WAITTIME); //待ち時間
        }
        public void write_command(byte[] buffer)
        {
            Debug.WriteLine("Write in byte : " + BitConverter.ToString(buffer, 0, buffer.Length));
            ReturnValue ret = API.Write(Handle, ref buffer, out count);

            if (ret != ReturnValue.SI_SUCCESS)
            {
                Debug.WriteLine("Write not success !!! {0}", ret);
            }
            Thread.Sleep(WAITTIME);//待ち時間

        }
        public void close_serial()
        {
            API.Close(Handle);
        }
    }

    class BDG2_data
    {
        public void command_R(byte[] buffer)
        {
            //  ここに受信データの解析や、出力を記載します。
        }
    }
}
/***************************************************************
 * Java - Raspberry Pi 言語サンプルコード(命令コマンド部分は購入後に公開しております)
 ***************************************************************/

/*

(1) Change Device PID to 0xEA60. This is enable to work as Serial Device.
Use CP210xSetIDs.exe from silabs.com


(2) Check your Raspberry Pi Kernel has Cp210x driver.
dmesg | grep 210x
lsmod | grep 210x
otherwise, You have to do compile kernel with
in Kernel configuration, You can find the device at :
Device Drivers -> USB support -> USB Serial Converter support ->
  USB CP2101 UART Bridge Controller

(3) Install library.
sudo apt-get install librxtx-java

(4)
in .bashrc, Add this.
export CLASSPATH=$CLASSPATH:/usr/share/java/RXTXcomm.jar
LD_LIBRARY_PATH=/usr/lib/jni/

(5) compile
javac bdg3.java

(6) execute
java -Djava.library.path=/usr/lib/jni/  jp.taroumaru.bdg3.bdg3

*/


package jp.taroumaru.bdg3;

import gnu.io.*; // こちらは、apt-get で install できる。
//import javax.comm.*; // Sun の Serial ライブラリだが、raspberry では使えない。

import java.io.*;
import java.util.*;


class bdg3 implements SerialPortEventListener {


    private SerialPort port;
    private InputStream inputStream;
    static OutputStream outputStream;
    private static BufferedReader reader;
    private static bdg3 obj;
    private byte[] cmd = new byte[5];

    bdg3() {
        try {

        	// シリアルポートの初期化
        	Enumeration portList = CommPortIdentifier.getPortIdentifiers();

            while (portList.hasMoreElements()) {
            	CommPortIdentifier portId = (CommPortIdentifier) portList.nextElement();
                if (portId.getPortType() == CommPortIdentifier.PORT_SERIAL) {

                     // シリアルデバイス Raspberry Pi で割り当てられたデバイスを探す
                     // dmesg | grep 210x で探せます。
                     if (portId.getName().equals("/dev/ttyUSB0")) {
                        try {

                            // デバイスオープン
                            port = (SerialPort)
                            portId.open("serial", 2000);
                        } catch (PortInUseException e) {}
                        try {

                            // 入出力の設定
                            outputStream = port.getOutputStream();
                            inputStream = port.getInputStream();
                            reader = new BufferedReader(new InputStreamReader(inputStream));
                        } catch (IOException e) {}
                        try {

                          // ポートの設定
                        	port.setSerialPortParams(115200,
                                SerialPort.DATABITS_8,
                                SerialPort.STOPBITS_1,
                                SerialPort.PARITY_NONE);
                            port.setFlowControlMode(SerialPort.FLOWCONTROL_NONE);
                        } catch (UnsupportedCommOperationException e) {}
                        try {

                          // データ(測定値)を受信した時のイベント
                            port.addEventListener(this);
                            port.notifyOnDataAvailable(true);
                        } catch (TooManyListenersException e) {
                            System.out.println("Error: " + e);
                        }
                    }
                }
            }


        } catch (Exception e) {
            System.out.println("Error: " + e);
            System.exit(1);
        }
    }
    public static String buffer2str(byte[] buffer) {

		  // Hex の値を画面に表示する

		  String bufferstr = "";

	        for (int i = 0;i < buffer.length; i++){
	            bufferstr += String.format("%02x ", buffer[i]);
	        }

	        return bufferstr;
	}
    public void run() {
        try {

            // 測定器に、測定値を返信するようにする命令(秘密保持契約書が必要です)
        	cmd[0]=0x00;
        	cmd[1]=0x00;
        	cmd[2]=0x00;
        	cmd[3]=(byte)0x00;
        	cmd[4]=0x00;

            OutputStream out = port.getOutputStream();
            out.write(cmd);
            System.out.println("Write: "+buffer2str(cmd));
            Thread.sleep(3000);
        	port.close();

        } catch (Exception e) {
            System.out.println("Error: " + e);
        }
    }

    public void serialEvent(SerialPortEvent event) {

      // データ(測定値)を受け取ったときのイベント

        if (event.getEventType() == SerialPortEvent.DATA_AVAILABLE) {
        	byte[] readBuffer = new byte[30];
            try {
               // read data
               while (inputStream.available() > 0) {
                  int numBytes = inputStream.read(readBuffer);
               }
               System.out.println("Read: "+buffer2str(readBuffer));
            } catch (IOException e) {}
        }
    }

    public static void main(String arg[]) {

        // 実行します。
    	obj = new bdg3();
    	obj.run();
    }
}
/***************************************************************
 * Android サンプルコード(命令コマンド部分は購入後に公開しております)
 ***************************************************************/

package com.example.bdg_for_android;

public class MainActivity extends Activity {

    private final String TAG = MainActivity.class.getSimpleName();
    private TextView tvMsg;

    private static UsbSerialPort sPort = null;
    private SerialInputOutputManager mSerialIoManager;
    private PendingIntent mPermissionIntent = null;

    private final SerialInputOutputManager.Listener mListener =
            new SerialInputOutputManager.Listener() {

                public void onNewData(final byte[] data) {
                    runOnUiThread(new Runnable() {
                        @Override
                        public void run() {

			    //データを受信後、誤り訂正符号のチェック
                            if (crc.checkcrc(data)){
                                updateReceivedData(data);
                            }
                        }
                    });
                }
            };

    @Override
    protected void onCreate(Bundle savedInstanceState) {
        super.onCreate(savedInstanceState);
        setContentView(R.layout.activity_main);

        tvMsg = (TextView)findViewById(R.id.tvMsg);


	//デバイスと接続
        if( connectUSB() ) {

	    //命令を送信
            send();

        }
    }


    private boolean connectUSB(){

        // デバイス情報の取得
        UsbManager manager = (UsbManager) getSystemService(Context.USB_SERVICE);

        UsbSerialProber prober = new UsbSerialProber(customTable);
        List availableDrivers = prober.findAllDrivers(manager);

        if (availableDrivers.isEmpty()) {
            tvMsg.setText("No available drivers.");
            return false;
        }

        UsbSerialDriver driver = availableDrivers.get(0);

        // 接続の許可
        if (mPermissionIntent == null) {
            mPermissionIntent = PendingIntent.getBroadcast(this, 0, new Intent("USB_PERMISSION"), 0);
        }
        manager.requestPermission(driver.getDevice(), mPermissionIntent);
        if (!manager.hasPermission(driver.getDevice())) {
            tvMsg.setText("The driver does not have permission.");
            return false;
        }

        UsbDeviceConnection connection = manager.openDevice(driver.getDevice());
        if (connection == null) {
             tvMsg.setText("Can not open a connection to the driver.");
            return false;
        }

        // Open port
        List myPortList = driver.getPorts();
        sPort = myPortList.get(0);
        try {
            sPort.open(connection);
            sPort.setParameters(115200, 8, UsbSerialPort.STOPBITS_1, UsbSerialPort.PARITY_NONE);
        } catch (IOException e) {
            tvMsg.setText("Error opening device: " + e.getMessage());
            try {
                sPort.close();
            } catch (IOException e2) {
                // Ignore.w
            }
            sPort = null;
            return false;
        }

        onDeviceStateChange();
        return true;

    }

    private void send() {

	// 送信コマンドを作成
        writeBuffer[0] = PACKET_HEAD;
        writeBuffer[1] = COMMAND_1;
        writeBuffer[2] = COMMAND_2;
        writeBuffer[3] = COMMAND_3;
        writeBuffer[4] = crc.makecrc(writeBuffer);


        try {
            sPort.write(writeBuffer, writeBuffer.length);
        } catch(IOException e){
            Log.e(TAG,e.getMessage());
        }

    }

    private void updateReceivedData(byte[] buffer) {

	// データを受信した場合
        ByteBuffer buffer_wrap = ByteBuffer.wrap(buffer).order(ByteOrder.LITTLE_ENDIAN);

        final String message;
        message = "Statistics : " + der_statistics + "\n"
                + "Dose rate  : " + (String.format("%.2f μSv/h", der)) + "\n"
                + "Dose       : " + (String.format("%.3f mSv", de)) + "\n"
                + "Dose       : " + (String.format("%.3f μSv", de_uSv)) + "\n"
                + "Dose time  : " + (String.format("%d second", de_second)) + "\n";

        tvMsg.setText(message);

    }

}
/***************************************************************
 * Arduino UNO 用のサンプルコード(命令コマンド部分は購入後に公開しております)
 *
 *  Arduino UNO は、ハードウェアシリアルポートが一つだけなので、
 *  ハードウェアシリアルポート(ボーレート 115,200) を測定器に利用、
 *  Windows のCOMポートに割り当てられたシリアルモニターが使えなくなるため、
 *  結果の表示に、SoftwareSerial mySerial(11, 12); // RX, TX を利用しました。
 *
 *  [ Arduino UNO ] --- [UART-RS485変換チップ] ----RS485ケーブル--- [ 測定器 ]
 *      |
 *      |
 *      +------[Serial USB変換器]-----[Windows PC]
 *
 ***************************************************************/


// for Arduino UNO

#include <SoftwareSerial.h>

#define PIN_RTS 3
#define BUFFER 30
int del=100;

SoftwareSerial mySerial(11, 12); // RX, TX

void setup() {

// 測定器は、115200 のボーレートが必要なため、Serial を利用。
  Serial.begin(115200);

// 動作結果の表示は、ソフトウェアシリアルを利用する。
// パソコン等につないで、teraTerm で結果を表示する。
  mySerial.begin(9600);

// RS485の送信・通信の制御ピン
  pinMode(PIN_RTS, OUTPUT);
}
void printbyte( byte *cmd, int length ){

// Byte の配列を hex の形で表示する
  int i;

  for(i=0;i<length;i++){
    if( ( cmd[i] >> 4 ) == 0 ){
      mySerial.print("0");
    }
    mySerial.print(cmd[i],HEX);
    if( i<length-1 ){
      mySerial.print(",");
    }
  }
  mySerial.print("\r\n");

}
void print_der(byte *buf){

  float der;
  int stat;

  union u_tag {
     byte b[4];
     float fval;
  } u;

  stat = buf[4+21];
  u.b[0] = buf[4+14];
  u.b[1] = buf[4+15];
  u.b[2] = buf[4+16];
  u.b[3] = buf[4+17];

  der = u.fval;

  mySerial.print(der,3);
  mySerial.println( " uSv/h");

  mySerial.print(stat,DEC);
  mySerial.println( " %");

}
void loop() {

  byte cmd[5] = { /* 通信仕様のコマンド */0x00, 0x00, 0x00, 0x00, 0x00 };
  byte txbuf[BUFFER];
  int i;

// データの書き込み
    mySerial.println("Writing..");
    printbyte(cmd,5);

    digitalWrite(PIN_RTS, HIGH);

    // RTS(送受信制御)を切り替えた後、少し時間を置いた方がよい
    delayMicroseconds(120);

    for(i=0;i<5;i++){
      Serial.write(cmd[i]);
    }
    // 送信後に、少し時間を置いた方がよい
    delayMicroseconds(400);
    digitalWrite(PIN_RTS, LOW);

    // RTS(送受信制御)を切り替えた後、少し時間を置いた方がよい
    delay(15);

// データの受信
    i=0;
    for(i=0;i<BUFFER;i++){
      txbuf[i]=Serial.read() ;
    }
    printbyte(txbuf,BUFFER);
    print_der(txbuf);

    delay(1000);

}
プログラム開発では、様々なプログラム言語で接続できるようにサポートしております。